Lessons Learned Negotiating for my First Car

In my early adulthood, I hated negotiating. The process seemed dirty, one which often felt like it required dishonesty. I remember my one attempt to haggle for a $25 t-shirt at a market in the Caribbean when I was 17. My strategy: opening my wallet and saying I only had $5. Somehow the merchant saw through this ruse. I ended up paying full price with the money from my other pocket.

Negotiating down the price of something is uncomfortable for many people:

  • It creates confrontation
  • Logically, items should be marked with a price that everyone pays
  • Even after coming to an agreement, there’s always a sense of wonder if the price could have gone even lower
  • “Professional” negotiators often exaggerate with guilt trips such as “I’ve got kids to feed”

    In Business As in Life, You Don’t Get What You Deserve, You Get What You Negotiate

Immediately after getting my first job offer soon after college, I went with my mom to the local car dealership. She was the negotiator in the family who drove the hardest bargain. I bought a car that Saturday from the first dealership I visited because I needed one for Monday. I went in expecting my mom to work her magic, but I sat and watched while the only additional value we extracted was an extra year of oil changes. Over time, I realized that I basically paid full price for something I didn’t have to, and I became determined to reduce my ignorance of negotiation.

An important concept to understand about negotiation is optimal pricing. Essentially, this means that the dealership wants to charge as much as any individual customer is willing to pay. The price is set to an arbitrarily high amount and each customer negotiates it down to an amount he or she is willing to pay. The dealership would not sell a car below what makes a profit. The salesman’s job is to make you feel like that baseline price is higher than it actually is. Does that make you feel more comfortable about negotiating? The additional money being paid above the baseline is going straight to profit!

The same applies to other scenarios, such as at a street market or negotiating salary. Obviously, there are many additional economic factors to consider, of which I know only a little. However, knowledge of this simple concept can ease discomfort about the negotiating environment.

Reaching the end of a job interview, the human resources person asked a young applicant fresh out of business school, “And what starting salary are you looking for?”

The applicant said, “In the neighborhood of $125,000 a year, depending on the benefits package.”

The interviewer said, “Well, what would you say to a package of five weeks’ vacation, 14 paid holidays, full medical and dental, company matching retirement fund to 50 percent of your salary, and a company car leased every two years, say, a red Corvette?”

The applicant sat up straight and said, “Wow! Are you kidding?”

And the interviewer replied, “Yeah, but you started it.”

-from Recruiters Network

Over the years, I’ve negotiated much more on my own, another car, home prices, salaries, etc. While I’m still very far from as proficient as I’d like to be, these experiences have taught me what to do and what are my weaknesses.

Create Objectivity by Having Someone Negotiate for You

A tip I learned from You Can Negotiate Anything is to ensure an objective party is negotiating for you. Because emotions often get in the way of logic, having someone who is invested only in reducing price can be highly beneficial. Relating this to my story above, my mom should have been objective in the situation but her own emotions were in play. She wanted to make sure I had a car so I didn’t have to borrow hers anymore. She did not want to experience the “pain” of lending her car any longer and was willing to have me pay to get my own.

Willingness to Walk away

The number 1 rule of negotiating is being willing to walk away from the deal. This gives you leverage.

In my example above, my mom was not willing to walk away, because she wanted me to have my own car. In other practical scenarios, this rule means that no one will give you a better price if he or she thinks you are going to buy something anyway. In contrast, if he or she senses your willingness to not come to an agreement, he or she will be more likely to meet your demands.

Collaborate on Less Significant Issues

Sometimes either party will not budge on the main issue, such as price. However, it can be possible to come to agreement on other items that are more significant to one side than the other. In the above example, this meant getting more free maintenance. In salary negotiation, it might mean getting extra paid time off or tuition reimbursement instead of a salary increase. There are many ways to add mutually beneficial clauses to meet in the middle of a negotiation. Additionally, this strategy is much less confrontational.

“If I give one to you, I have to give one to everybody else”

When going into a negotiation, make sure you understand the worst case scenario. Where possible, prepare beforehand to improve the worst case scenario. If missing out on a job opportunity means not having a job, then you can improve the worst case scenario by trying to line up a second job offer. Little tips like the ones above, plus many others, can help to make you a deadly negotiator, and as with anything, practice makes perfect.

Advertisement

How to Generate .NET Classes from a Non-.NET Data Feed

Most people do not realize how much data is available on the web via APIs. Indeed, we .NET programmers tend to be a breed that ignores the trendy new data feeds that are available. Perhaps it’s because it is intimidating to try to interact with sites written in PHP or Ruby on Rails or maybe it’s because the only examples anyone ever shows are for Netflix or Twitter APIs (2 APIs that are not particularly useful for an Enterprise Developer). Now is the time to expand your horizons. As more and more data becomes available, the usefulness increases for all types of applications. I aim to broaden your awareness of the entire domain of public web services (APIs) and show you that

  • .NET can be a great client coding-language for any standard web API
  • There are great online resources to find available APIs.


Table of Contents

Before I dive head first into all the details, here is an outline of what I will cover and the basic steps involved:

  1. Purpose/Intention
  2. Choosing an API
  3. Review Documentation
  4. Determine a Sample Query
  5. Generate Classes at Json2CSharp.com
  6. Paste Generated Classes into New Application
  7. Massage Generated Classes
  8. Reference Json.NET
  9. Retrieve Data with a WebClient Object
  10. Display Results within Application


Purpose/Intention

At this point, you may be asking yourself, “why do I care about Data Feeds, APIs, and public Web Services”? You should care because it is the technology through which online companies share their data. If you think it might be worthwhile to someday automatically retrieve the weather forecast, stock prices, sports scores, site analytics, etc. and make logical decisions based on the data, then pay attention because the steps that follow are how you get started. A well-known example of a website using a public APIs is Expedia.com, which retrieves commercial flight and hotel information from multiple providers based on a user’s travel criteria. There’s very little stopping us .NET developers from gathering together multiple APIs in a similar fashion.


Choosing an API

The first step of connecting to an API is to choose which one you will connect to. If you already know, you need to find out more information about it. To do this, I used ProgrammableWeb.com, an online directory of public-facing APIs. When I started the exercise for this blog post, I did not know which API I wanted to test with, so I just clicked on API Directory | Newest APIs. As tempting as it was, I chose not to use the Stack Overflow API, because it is already built in .NET and is therefore disqualified from this blog post. Instead, the API for the Khan Academy caught my eye.

In case you haven’t heard of it, Khan Academy is a non-profit organization that provides a wide range of training videos and courseware for free online.

The Khan Academy API is perfect:

  • It’s not a .NET service written in WCF (it’s Python)
  • I hear about the site all the time. It’s sexy right now.
  • It follows a web standard, REST formatted in Json.

By clicking the Khan Academy link in the Programmable Web directory, I was eventually taken to the Khan Academy API documentation site.


Review Documentation

Many large websites have thorough documentation about their APIs. Still, there is a wide range of information that you may come across when researching them. Some have client-side examples in .NET and others even have 3rd party libraries (e.g. MailChimp) specifically written for them. Khan Academy has a nifty tool called their API Explorer, which allows you to click on different types of REST queries and see example responses. . I’ve seen similar tools on other sites too, such as Yahoo.


Determine a Sample Query

To start creating our .NET client application, we need to determine a sample query and retrieve response data. I’d like to generate local, .NET classes to consume the information sent back from Khan Academy.

There are a couple different ways of thinking about this:

If I know specifically what type of information I will be using, I can look for documentation on how to retrieve that narrow result set. In this case though, I want to start with as many classes as possible, to fill out my .NET solution with a large portion of classes.

The playlists/library/ query is great because it returns nested results. So, for example, it has information for playlists, with sub-information about videos, tags, etc.

Having a sample response like this is half the battle, and it’s not that difficult to get for REST services.


Generate Classes at Json2CSharp.com

Once we know what sample query we are going to use, we continue to our 2nd big step, where we either paste a URL or Json results into a website named json2csharp.com.

This website converts the sample response data that we entered into .NET class definitions. With this step, we are letting the Json2CSharp website perform a significant step of the process for us automatically.

Why do we go through the effort to generate .NET classes like this?

  • It enabled compile-time checking and intellisense
  • Design-time use in Web Forms Gridviews, etc.
  • Can be used in older versions of .NET (earlier than .NET 4), which do not yet have dynamic objects.


Paste Generated Classes into New Application

Now that I have generated .NET classes, I will copy them into my Windows Clipboard (Ctrl-C) for later use.

Let’s keep things simple by creating a brand new Web Application. In Visual Studio 2012, select File | New | Project. Then select an ASP.NET Web Forms Application.


With the new application in place, let’s add the .NET classes into the solution.

First, add a class file to the project.


In this file, paste (the .NET classes that are in your Clipboard) over the default class. As a quick sanity check, you should be able to successfully compile the solution.


Massage Generated Classes

Json2CSharp sometimes struggles with ambiguous responses. As a result, it generates duplicate class definitions as is true in our case.

Still, it’s nice that the class generator got us part of the way toward our final code. Let’s massage our classes to remove any classes that have numbers on the end. Also, switch any reference to the duplicates back to the primary class.

Delete: Item2, DownloadUrls2, Video2, Playlist2, DownloadUrls3, Video3, Playlist3

Alter: References to Item2 -> Item, References to Playlist2 -> Playlist, Reference to Playlist3 -> Playlist


Reference Json.NET

In order to deserialize Json results into our generated classes, we need to use another 3rd party tool named Json.NET. To add a reference to this library, we can perform either of 2 methods:

Download and Add Reference

  1. Browse to Json.CodePlex.com
  2. Download the latest version as a .zip file
  3. Extract the relevant version of the Newtonsoft.Json.dll
  4. Add a reference to the dll

Install with NuGet

  1. In Visual Studio, go to Tools | Library Package Manager | Manage NuGet Packages for Solution
  2. Click Online in the left panel
  3. Click Json.NET to highlight that package
  4. Click Install


Retrieve Data with a WebClient Object

At this point, we’ve got the framework setup in our solution to store strongly-typed representations of the Khan Academy data. Next, we need to write the code to retrieve that data.

Here is the snippet I put in the Default.aspx.cs file to automatically retrieve the data and format it with Linq.

public static List<Playlist> GetKhanVideos()
		{
			var client = new WebClient();
			var response = client.DownloadString(new Uri("http://www.khanacademy.org/api/v1/playlists/library"));
			var j = JsonConvert.DeserializeObject<List<Item>>(response);

			List<Playlist> playlists = new List<Playlist>();
			playlists.AddRange(j.Select(i => i.playlist));
			playlists.AddRange(j.Where(k => null != k.items).SelectMany(i => i.items).Select(i2 => i2.playlist));
			playlists.AddRange(j.Where(k => null != k.items).SelectMany(i => i.items).Where(k2 => null != k2.items).SelectMany(i2 => i2.items).Select(i3 => i3.playlist));

			return playlists.Where(p => null != p).ToList();
		}


Display Results within Application

In our last step, we want to see the output of our query, so let’s leverage the drag-and-drop ability of Web Forms to easily visualize the data.

  1. Open Default.aspx in Design View
  2. Using the Toolbox, add an ObjectDataSource
  3. Configure the DataSource
  4. Choose WebApplication1._Default as the business object
  5. Choose GetKhanVideos() as the Select Method
  6. Using the Toolbox, add a GridView
  7. Configure it to choose the above Data Source
  8. Many of the fields will be empty or gibberish, so let’s remove several columns:
    1. backup_timestamp
    2. hide
    3. init_custom_stack
    4. ka_url
    5. kind
    6. standalone_title
    7. topic_page_url
    8. url
    9. youtube_id

To see the new application in action, press F5 to run it.


Conclusion

With the help of a few 3rd party tools, retrieving and displaying any REST-based API in .NET can be easy. Not only that, but it’s going to get even easier. In Scott Hanselman’s ASPConf keynote, he showed an extension that is being developed by Mads Kristensen for Visual Studio 2012 that would eliminate several of these steps. It allowed an option in Visual Studio to “Paste JSON as classes,” thereby eliminating the need for the class-generation website. Microsoft realizes that the trend of creating and leveraging public APIs is not going away so they are doing something about it. And so should you.


Disclaimer: This product uses the Khan Academy API but is not endorsed or certified by Khan Academy (www.khanacademy.org).

A Review of our Time Tracker Software

I work at a small, but quickly growing consulting startup. At first, time-tracking was a significant pain for me and the owner. I spent a lot of thought trying to automate my personal time-tracking and had decent success using FogBugz and Paymo. However, no matter what I tried, I was still required to spend about 3 hours a month (1.5 hours per billing period) exporting my time records into an acceptable MS Excel format to be given to the client. I understand that there was even more work done by the owner, as he made sure every consultant’s format was the same, copy-and-pasted records into one huge spreadsheet, and invoiced the client based on this report. What a mess! That was time that should have been spent on client work, advancing the projects to which we were assigned and making more money in the process. Thankfully, after some brainstorming and research, our company standardized on Harvest for time tracking.

What we wanted was an affordable, centralized solution that could track time and enable invoicing for all employees at the company. Harvest has delivered even more than we thought we needed! Included with our monthly payment, we receive a mobile app, API use, and expense tracking.


Harvest Time Tracking


Design

One thing I like about Harvest is that it is definitely a modern-looking website that is continually being updated. The site is also intuitive and visually appealing. It was not long before we learned how to make an invoice online.


Usefulness

Simply put, Harvest saves us time. What used to take me 90 minutes at the end of each billing period now takes me 5. It’s also very easy to manage and create invoices. I think it’s fair to say it’s worth the money considering we keep paying the fee every month.

In addition to its advertised features, online time tracking provides insight and transparency into key aspects of our business:

  • Employees’ work habits
  • Progress of projects and budgets
  • Real-time snapshots of what work is currently being performed


The Time Tracker App

Members of our team have used the Harvest Time Tracking app for Android and iPhone. It is pure icing on the cake. It has its limitations but it saves me a lot of time in 2 particular use cases.

Expense Tracking

I can easily keep my expenses organized with this app. The best feature is the ability to add expenses and to take a picture of any receipt as soon as I receive it. By making it so simple, it encourages the habit of inputting expenses almost instantaneously, reducing the likelihood of losing track of a receipt or forgetting about a meal. It can be humorous to see a few members of our team out to eat on a business trip as we all take out our phones to take pictures of our separate receipts.

Stopping a Running Timer

Simply explained, the smartphone app gives me mobile access to my online time sheet. This is especially useful if I leave the office to run an errand or go home for the day but absent-mindedly leave my timer running. I can quickly take out my phone, open the app, and stop the running timer. It syncs with the Harvest server soon after.


The iPhone app does have some limitations. The key item I’d like to see improved is the ability to edit time entries (which is possible on the website). As explained in my most common use case above, if I leave a timer running I might remember to stop it while I’m on the go. It would be nice to be able to edit the time entry to change the end time to be earlier (when I actually stopped working). As it is now, I have to remember to go back and change that time entry the next time I’m in front of my computer.


API

I’m not yet a connoisseur of web APIs, but Harvest seems to have a good one as far as I’m concerned. As an experiment, I wrote a simple website in just a few hours to display whether or not I am working at any given moment.


Integrations

I haven’t yet had the need for many of these but it is encouraging that Harvest time tracking integrates with many common software-as-a-service tools such as InDinero, Twitter, ZenDesk, and HighRise.


Summary

It should come as no surprise that I consider Harvest to be some of the best small business software I’ve used. It runs the core of our business and draws few complaints. It’s especially easy to bring on new consultants, requiring almost zero training. In that case we typically say something like “just use Harvest for time tracking.” And they do…

Don’t Disrespect the Web.Config – ELMAH

This blog series has focused on simple changes that can be made to a .NET solution’s web.config in order to enhance the development environment, enhance security, and improve troubleshooting capabilities.

You can find previous posts here:

  1. Use web.config transforms to keep track of development versus production settings
  2. Encrypt important configuration sections for security
  3. ELMAH – Error Logging Modules and Handlers

This is the 3rd and final post of the series in which we discuss ELMAH, short for Error Logging Modules and Handlers. I am definitely not the first to write about this, but it is such a useful tool that fits snuggly into the web.config that I had to include it in the series.


What is it and why do I care?

First, let’s explain what ELMAH is. It is an open-sourced component that can be easily added to a .NET project for the purpose of logging and notifying developers of unhandled exceptions. What is an unhandled exception? It’s an error in code that a web application cannot respond to, often resulting in a “Yellow Screen of Death.”

ELMAH does not, by itself, rid your application of a Yellow Screen of Death, a screen that causes much frustration among users of your application. Instead, it automatically logs the details of the exception, and the stack trace at the time of the exception, and it can even email the development team that something bad happened.

Using ELMAH has become the standard for any project that I work on. It’s just so darned useful for troubleshooting issues and doing great customer service.


Typical Workflow of a User Encountering an Error

Most of the time, users encountering an error do not immediately send an email to support. If it’s a public website, the user might get immediately discouraged and leave the site. If it’s an Intranet website, one that users must use to perform their jobs, then he or she might back up and try it again a couple of times before giving up:

  1. Attempt to perform job function
  2. Curse at screen when exception occurs
  3. Try again
  4. Complain to boss when the same failure occurs
  5. Contact support
  6. Wait
  7. Lose faith in the developers of the website, the support team, and anyone else who is guilty by association


Workflow when Error Notifications are Involved

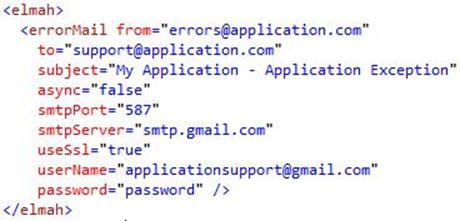
With ELMAH in place, it is easy to short-circuit the workflow and keep users happy. You can begin to troubleshoot the issue before the user has even contacted the support team.

  1. User attempts to perform job function
  2. User curses at screen when exception occurs
  3. Development team member is notified that exception occurred along with details
  4. As the user attempts to try again, the development team member can reach out to the user

    Hello [username],

    I work on the support team for [name of web application]. Our system automatically notifies us when users run into an error that it does not know how to handle, and we are aware that it affects your ability to continue through the application.

    We do not yet know exactly what the problem is, but are working to find out more information and resolve the issue quickly. I will let you know as soon as this is fixed.

    In the meantime, it would help us to resolve this more quickly if you could tell me [what steps you were performing when this crashed].

    Lastly, I know it is less than ideal, but you might try to [perform your job through this work-around or alternative solution] until I get back in touch with you.

    Thank you,

    [Nathan Stuller]

    [Title]

  5. Often, by the time the user would have contacted support, the issue is already fixed


Being proactive makes a serious impression on users (and bosses). I’ve used this technique before to reach out to customers about exceptions that they didn’t even notice. It reduced my stress level by confirming that it was a low-priority issue and also allowed me to engage with a customer about my product.


How to Get Started

The first step is go to the ELMAH homepage. There you will find the 2 most important links to enable this setup:

  1. Download links to the ELMAH dll you must include in your project
  2. A sample Web.config file (on the same page)


The Real Steps

  1. Download the appropriate binary to your web application folder.

  1. Open the zip file. Browse into the “bin\net-2.0\Release” folder and extract the Elmah.dll into your Libs folder.
  2. In Visual Studio, we need to make a reference to this dll from your main web project.


  1. Next, you need to add entries into the web.config to tell your project how to use ELMAH. The website has lots of information on how to do this, but I will try to simplify it for the common example of notifying developers by email. First, you need to add this line inside the <configSections> area of the web.config:

  1. Next, add the following line under the <httpModules> section. This may need to be altered depending on which version of IIS your web server is using:

  1. Lastly, add the elmah section (usually at the end) inside the <configuration> section:

There are a host of configuration options you can set to enable ELMAH to do exactly what you want.


Wrapping Up

I hope this 3-part blog series has helped you identify simple improvements that can be made to the web.config file. ELMAH, in particular, helps me delete my clients and since it is so simple to implement, to me it is a no-brainer.

Don’t Disrespect the Web.Config – Encryption

As stated in an earlier post…

There are 3 things every public website should be doing with their web.config

  1. Use web.config transforms to keep track of development versus production settings
  2. Encrypt important configuration sections for security
  3. ELMAH – Error Logging Modules and Handlers

In this post, we’ll discuss how to encrypt sensitive sections of the web.config so passwords and other information cannot be easily read by those who gain access to the file.

Why is it important?

Encrypting sensitive sections of the web.config is important because they are just that, sensitive. Think about your production web.config file. It may contain all sorts of data that you would not want to be accessible. There are often passwords for SQL database connections, passwords to an SMTP server, API Keys, or critical information for whatever system is being automated. In addition, web.config files are usually treated as just another source code file. There are probably many versions in your source control system right now. That means, any developer on the team, or more accurately anyone with access to the source code, can see what information is in the web.config file.

In many cases, storing passwords in a web.config is itself unnecessary and should be avoided. However, we know it is all too easy to fall into the trap of placing them in this flexible, convenient file. Therefore, at the very least, certain sections should be encrypted so they cannot be easily read or used for evil.

Encrypting ConnectionStrings

In our example, we will encrypt two typical configuration sections: ConnectionStrings and AppSettings on a Windows 7 development machine.

Follow the below steps:

1. Open a command prompt with elevated, Administrator, privileges:

2. At the command prompt, enter:

cd “C:\Windows\Microsoft.NET\Framework\v4.0.30319”

3. Now enter the following to encrypt the ConnectionStrings section:

aspnet_regiis.exe -pef “connectionStrings” “C:\WebApplication1\WebApplication1”

In this case, C:\WebApplication1\WebApplication1 is the directory where our web.config is located.

4. Enter the following to encrypt the AppSettings section:

aspnet_regiis.exe -pef “appSettings” “C:\WebApplication1\WebApplication1”

For reference on all the command-line options of aspnet_regiis.exe, refer to this MSDN page.

Decrypting ConnectionStrings

Of course, it is possible you might need to be able to read the original, unencrypted, data at a later time. To access that information is easy. Simply perform the previous steps but use the command-line option “-pdf” to decrypt the important sections.

Deployment

Deploying your web application with encrypted web.config sections is simple, but it may not be obvious. This StackOverflow answer explains the steps best. Generally, any server or development machine that uses the same encrypted web.config data must use the same RSA key pair, which can be exported using the aspnet_regiis tool.

Before and After

There you have it. You have successfully encrypted 2 sections of your web.config file. Take a look below to observe the before and after results:

Before

<connectionStrings>

<add name=ApplicationServices connectionString=data source=.\SQLEXPRESS;Integrated Security=SSPI;AttachDBFilename=|DataDirectory|\aspnetdb.mdf;User Instance=true
providerName=System.Data.SqlClient />

</connectionStrings>

After

<connectionStrings configProtectionProvider=RsaProtectedConfigurationProvider>

<EncryptedData Type=http://www.w3.org/2001/04/xmlenc#Element
xmlns=http://www.w3.org/2001/04/xmlenc#>

<EncryptionMethod Algorithm=http://www.w3.org/2001/04/xmlenc#tripledes-cbc />

<KeyInfo xmlns=http://www.w3.org/2000/09/xmldsig#>

<EncryptedKey xmlns=http://www.w3.org/2001/04/xmlenc#>

<EncryptionMethod Algorithm=http://www.w3.org/2001/04/xmlenc#rsa-1_5 />

<KeyInfo xmlns=http://www.w3.org/2000/09/xmldsig#>

<KeyName>Rsa Key</KeyName>

</KeyInfo>

<CipherData>

<CipherValue>fK275KFHx9RKip16DTpwxLi4AHpvCpat4S3edgsDwco9PgudsMKc1qAyh9qNt2y+90qV4QIzyZXm8j27UV5J+R5rNruMUOROLWzVt8qkRYRM3ADoiCi5BJh2SsjE0guGXFbufZDgRpPFV5bstgZSBPYNiYXQF/aOLyQjPCE8VDo=</CipherValue>

</CipherData>

</EncryptedKey>

</KeyInfo>

<CipherData>

<CipherValue>CSdausUH7yWcY8t1sPUqiCooYreEauzi4t33gVJuWYcfhspsguTchJjwthUTMLqnulYRmCu8ZnhrVBepQo7PHO/4k5mwo3s46TsgFddvvUlyY/EDQf047LG0pocBDxL3MgIGf3b+atoG29Jg0Wnhj+M6urYG55Ko4nGp36JILQptlEn+sqCl2sQ99izykXtRWP7kC4tldO+YvBuZ7x8fyGoANwSKQFo7cH+dbydvCkRvaFQsRATdsQKGmSrXwIlkoNvxFb1CBPx0qDenyCs+vO4QyF2CZ8QB+UIJzA8EL7W/FovH5zDczjXQWTsFSmsI+vSojl9G9jSVLJFbwOpQBLIKxfximl5r</CipherValue>

</CipherData>

</EncryptedData>

</connectionStrings>

In a future blog post, we will discuss the 3rd party component ELMAH, which is vital to being notified when your users encounter exceptions in your web application.


Update 07/24/2012
It is possible to combine encryption with web.config transforms. I know this will work as I have done it before.

In my experience, I’ve done the following. I had to add an RSA section at the top of my web.config. For me, this went into my web.config.release as I did not encrypt my default/development web.config:

<configProtectedData defaultProvider=”MyRsaProtectedConfigurationProvider” xdt:Transform=”Insert”>
<providers>
<add name=”MyRsaProtectedConfigurationProvider”
type=”System.Configuration.RsaProtectedConfigurationProvider, System.Configuration, Version=2.0.0.0, Culture=neutral, PublicKeyToken=b03f5f7f11d50a3a, processorArchitecture=MSIL”
keyContainerName=”NetFrameworkConfigurationKey_viternuscom”
useMachineContainer=”true” />
</providers>
</configProtectedData>

Also, the web.config sections need to be replaced at the section level. You cannot replace the name or connection string attributes. So, you can use something like the below configuration to replace the whole connection strings section in each environment:

<connectionStrings configProtectionProvider=”MyRsaProtectedConfigurationProvider” xdt:Transform=”Replace”>
<EncryptedData Type=”http://www.w3.org/2001/04/xmlenc#Element&#8221;
xmlns=”http://www.w3.org/2001/04/xmlenc#”&gt;
<EncryptionMethod Algorithm=”http://www.w3.org/2001/04/xmlenc#tripledes-cbc&#8221; />
<KeyInfo xmlns=”http://www.w3.org/2000/09/xmldsig#”&gt;
<EncryptedKey xmlns=”http://www.w3.org/2001/04/xmlenc#”&gt;
<EncryptionMethod Algorithm=”http://www.w3.org/2001/04/xmlenc#rsa-1_5&#8243; />
<KeyInfo xmlns=”http://www.w3.org/2000/09/xmldsig#”&gt;
<KeyName>Rsa Key</KeyName>
</KeyInfo>
<CipherData>
<CipherValue>fV3NsFhZR/l0/5nvioFfjwjhhauNUTR96fQOK3QeRTW05ERDAQrFGj9MBt5Jh7Ca4rIS2JZfOfNTjTxWiEp/tjk+9LXVyPKrJYMiNlYiUmZGfV/amPsLPmRm2pOEyKwJhJLN6NyZdht/xGrf1ClDKO6CG1ViA5pK5R8Db8X9ul4=</CipherValue>
</CipherData>
</EncryptedKey>
</KeyInfo>
<CipherData>        <CipherValue>eFvSbAzbVUzwa9Sl8V6t43kuwAcvmaPUjboSJ/oi+MMJXyqtqXS8dKSuxBy+E0rC8tUxxIfJppZNm+CCoKf9Rm39vW2flpgcsvm8ZNMekSf4r2GWYAvLw3vYvMBcbnFRqktlaM7cXia38+3KGN8skHzxioqrBgy2QQqqPWIPrmrCS440BRlXEck6XwAO9rZOERgM6+OtlRan4EuGoB0O4acJWbp51zWxkfzqxMb600BHkYzeIYkHH8GNvWo+LSQt6o+NYW+Q7sm/lLFY5hPp3pGTOygXPehT1b/3BWZM+1dJ5sh8sBXO+t5m7/Dzqt4nvMqArmdEUvQdhYAPauC3Uj9HjDFpHkbOjVEzohIvB0kJ1Wc3uP4VvE6CRMbAsrRiSNLDlT6OpXYVrArLk9c1bBA56nFXPMxLEpN1umRcCfaQY0qxKrZi/yJ8dKD/C/5Vo7o50f10jM9eUrt3/uS71bNJk5U9N7kO42tZZGXZMui51o6MWcYxSC7VQ3KdCpy6UacBnD8MYr7EHeZ591ATQds8dzcsXY7w6Lsg1pXLK74HqXMW/xDeLtBoWJxat9y+</CipherValue>
</CipherData>
</EncryptedData>
</connectionStrings>

I hope this helps.

“What Makes a Nickname Stick?” – a Toastmasters Presentation

Today I present to you my 7th Toastmasters Speech. The focus of this speech is to prepare by researching the topic. The speech should be 5-7 minutes long.

Some of the feedback I received was that the speech didn’t fit the “research” tag in traditional sense. It also was short, coming in at only 4:45.

I thought the criticism was fair. However, in my defense, about half of my speeches are almost purely research related, about careers or technical topics. So, I didn’t feel like I had to prove I could do that. Also, this speech did require a fair amount of research (though I didn’t reference it specifically in my speech). I had to look up Cavaliers nicknames, accurate movie quotes, and search for the origination of nicknames for inspiration.

Here is one of the sites I used as a reference: 25 worst nicknames in NBA History

And if you were wondering more about that yearbook picture I refer to, here it is (I don’t remember being that much of a Surge fan):

First-Hand Tips to the Interviewee

Through recent discussions with interviewers such as HR managers, Project Managers and Technical Hiring Managers, I’ve compiled a list of first-hand tips to job candidates. I hope they are helpful to you.

From Conversations


“[A] stumper for more entry level individuals is the ‘where do you see yourself in 5 years’? Many times (most times) it is ‘manager’. Given that they are probably interviewing with the manager, they should think what the manager wants them to say which is more ‘an expanded role in what I am interviewing for’. This stumps many of the interviewees. Remember, the interview is about the company not about the interviewee.”

Pat Tokarcik – HR Director – ShurTech Brands, LLC


“There is one piece of advice to the experienced or inexperienced that I’d pay forward – [get] Gallup’s Strengths Finder & set out some realistic development goals as part of self discovery.

I didn’t think about the book when we discussed ratings the other day, and it’s a pretty important piece of advice that was recommended to me & I’ve been successfully deploying in my ‘self discovery’ phases of life. I wish someone would’ve told me that after college. Nevertheless, interview advice for college grads, especially recent college grads, is to focus on strengths and deploy those for confidence. If you gain confidence through preparation or whatever gets you to that ‘I’m ready’ feeling, then you are going to more easily control your behaviors on the ‘stumping’ questions or even the relatively easy ones. It’s also being comfortable that you don’t know everything and don’t have to, giving the interviewer a chance to draw their own conclusions on that.”

Lacey Strete – Special Projects Analyst – Construction Software Technologies


“Bring portfolios of your work if you have it and be prepared to discuss what is included. Interviewers are focused on a variety of your attributes. If I find an entry level candidate who exhibits confidence in their abilities (even if they need to be fine tuned from a technical standpoint), but who also has confidence in their communication skills and can speak to what they have created, I see potential for a future mentor/manager. Candidates who can fill those roles in the future are incredibly valuable.”

Natalie Stuller – HR Manager – WS Packaging Group


“I’m reminded of an interview I did a few years ago. I asked a guy about a specific version of a program or application, and his response was something along the lines… ‘I did xxx which is similar in the past, and since it should be the same principles, I could adapt to figure it out. Plus if I have specific issues I can always use Google and figure it out.’

I thought it showed his ability to work outside of the box and solve his own issues, and he turned out to be one of the few people on my team who could.”

Jeff Strempel – Consultant – Accenture


Already in the Public Domain

Of course, there are some tips already on the Internet that can be very useful for interviewees.

In this YouTube clip, Jason Calacanis, an entrepreneur, speaks for a minute or so about having candidates self-rank themselves.


Lastly, this YouTube clip was produced by Toastmasters, an international organization helping members to be better public speakers. Here are 5 key tips to interviewing for a job.

Don’t Disrespect the Web.Config – Transformations

No matter how large of a project you are building nor how many lines of code you maintain, the most important file in your whole solution is likely the web.config file. It potentially contains connection strings, API keys, passwords, etc. If any of this information is incorrect you will likely see many problems in your application. Likewise, if a hacker were able to examine this file, it could mean disaster for your network. It is for these reasons that the web.config file must be treated with the utmost respect.

There are 3 things every public website should be doing with their web.config

  1. Use web.config transforms to keep track of development versus production settings
  2. Encrypt important configuration sections for security
  3. ELMAH – Error Logging Modules and Handlers

Each of the above topics will be covered in a separate post. As for today, we’ll discuss #1. Visual Studio 2010 introduced web.config transforms, which make it dead simple to maintain configuration information for multiple deployment environments.

The scenario:

Imagine the not-so-rare network setup of a website that is deployed on a production server, a test server, and is run locally by developers. In the old days, it was difficult to keep track of all the different environment-specific configuration options. Maybe you set the web.config correctly once for each environment and just never overrode it during a new publish. Maybe you created your own configuration text files that were dynamically linked into the application. Either way you had to spend extra time to solve this seemingly simple problem.

Thank goodness for modern IDEs.

Now it’s extremely easy to setup multiple configuration files in your Visual Studio solution, with these additional benefits:

  • Easy integration into source control
  • Each separate web.config file is tied to a Visual Studio build configuration
  • Easier integration into automated builds and deployments

Since the web.config transformation technology has been around for about 2 years now, I’ll try and introduce a new spin on it by demoing this with the Visual Studio 11 Beta.

How to set it up:

  1. Open your project in Visual Studio 11 Beta. Note: new projects in Visual Studio 2010 and 11 already have multiple config transformation files.
  2. Open the Build menu and navigate to the Build Configuration manager.
  3. Click the Active solution configuration drop down list and select New.
  4. Enter information for your test environmentbuild configurations
  5. Right click on the web.config file and select Add Config Transform. Note: If this option is not available, see this link.web.config transforms
  6. You will now see a web.config for each environment you support (Debug representing the developer’s local environment, Test representing Test, and Release representing production).

    config transform

  7. Next, we introduce the environment specific settings for your web.config files
    1. My web.config files typically have environment-specific information in the appSettings and ConnectionString sections:

    <appSettings>
            <add key=apiKey value=“83ABC029538FED091ACDD”/>
    </appSettings>
    <connectionStrings>

    <add name=DBConnectionString connectionString=Data Source=DBServer;Initial Catalog=DatabaseName;Persist Security Info=True;User ID=userName;Password=password providerName=System.Data.SqlClient/>

    </connectionStrings>

    1. Since the above is configured for my development environment, I usually leave my web.Debug.config blank
    2. In the Web.Test.config and the Web.Release.config I replace my appSettings and connectionStrings sections with environment specific values (see this website for detailed information on syntax)

    <configuration xmlns:xdt=http://schemas.microsoft.com/XML-Document-Transform>

    <appSettings xdt:Transform=Replace>
            <add key=apiKey value=B153439AB3DE8FF9CA9D0/>

    </appSettings>
    <connectionStrings xdt:Transform=Replace>

    <add
    name=DBConnectionString
    connectionString=Data Source=ProdDBServer;Initial Catalog=ProdDatabaseName;Persist Security Info=True;User ID=userName;Password=password
    providerName=System.Data.SqlClient/>

        </connectionStrings>

  8. Now just choose the build configuration and publish a project. It will automatically merge the correct web.config values based on the selected build configuration.

    asp.net publish


Beautiful. Your app has been deployed with the appropriate environment-specific web.config settings. In the next post, we will discuss how to encrypt secure information that is stored in the web.config file.

Top 5 Cities to Earn as an IT Employee

Having lived in the Midwest my entire life, the idea of moving to a big city, with its increased cost of living, was overwhelming. Nonetheless, over the past several years I’ve fantasized about living and working in different US cities. There are many good reasons to move across the country (away from family): Moving To New Cities

  • Startup Hubs (e.g. Silicon Valley)
  • Top Notch Universities (e.g. The Research Triangle)
  • Better Weather (e.g. Southern California)
  • Better Geography (e.g. near the Ocean or Mountains)
  • Access to Specific Industries (e.g. Fashion in New York)

However, the cost of living difference between cities (and the decreasing value of my salary) have always been at the forefront of my thoughts.

One way I tried to overcome my hesitation to move was with research. Using Salary.com, I calculated the increase in cost of living compared to my current city. This helped me to analyze just how much more it would cost to live somewhere else. The ratios were drastic, yet I knew I had to be missing something.

As a software developer, I’ve been using Robert Half Technology’s Salary Guides throughout my professional career as a way to compare my own salary against the average developer in my hometown. They’re a great resource. After all, they’ve been creating the guides since 1950.

I soon realized that the cost of living changes are not created equal for all careers. Likewise, a developer that moves to a technology hub will get paid more in that location. The more important ratio to analyze is very simple: %Salary Difference – %Cost of Living Difference. A more positive number is therefore better.

Results

I compared 105 cities that had ratings in the 2 guides above. Using Cincinnati, OH (my current location) as the comparison, I came up with several big cities that actually have a positive impact on salary value.

Best value cities for someone in IT


Locale

Salary Vs Cincinnati %

Cost of Living %

Difference

Houston, TX

106.7

95.4

11.3

Salt Lake City, UT

102.6

92.7

9.9

Memphis, TN

97.4

93.3

4.1

Raleigh, NC

106.7

104.2

2.5

Austin, TX

106.2

104.3

1.9


The worst values were also highly interesting


Locale

Salary Vs Cincinnati %

Cost of Living %

Difference

Honolulu, HI

94.4

189.7

-95.3

New York, NY

144.6

203.7

-59.1

Washington, DC

133.3

176.7

-43.4

San Francisco, CA

139.0

180.3

-41.3

San Diego, CA

117.9

156

-38.1


Conclusion

I must admit I am rather surprised by this list in which I also discovered that Cincinnati ranks #9 out of the 105 cities. Perhaps the reason my instinct is to stay put is because I’ve been pretty spoiled.

How I Enjoyed the Rock Paper Azure Competition

Rock Paper AzureIn mid-December, I saw an ad on StackOverflow.com and was immediately intrigued. “Rock, Paper, Azure!” was a contest run by Microsoft wherein programmers design bots to compete in a modified game of Rock, Paper, Scissors. The bots had to be hosted in Microsoft’s cloud computing platform, Azure, so you can easily see Microsoft’s motivation to give away some small prizes to influence developers into trying and (hopefully) adopting Azure.

Although I had plenty of things to keep me busy leading up to Christmas, the Rock, Paper, Azure marketing worked on me. I figured I could take 1 or 2 hours out of my time and write the best algorithm I could in that time. Besides, I would be entered into the grand-prize contest drawing just for competing with even the most simple of bots.

Bugs LanguageI was immediately reminded of a school project from an early Computer Science course at Ohio State. The contest back then pitted “bug bots” from teams of students in the course against each other. Each team started out with a handful of bugs on a large virtual checker board. A bug could “convert” another student’s bug by facing it and issuing the “bite” command. The bitten bug would then become a member of the “biting” bug’s army. The game continues until one team has converted all bugs. If I remember correctly, there were only a few possible commands:

  • “Detect” if an object (like a wall or another bug) was in front of it
  • “Move” forward 1 square
  • “Rotate” left or right
  • “Bite”


It may have evolved since then, but our bot did surprisingly well back then despite a very simple algorithm:

  1. If something in front, turn left, bite.
  2. Else, move forward, bite.
  3. Repeat Step 1.


I’ve often wondered what additional strategy I would write into my bot if given another opportunity in such a competition. Rock, Paper, Azure was the challenge I was looking for.

Microsoft’s version of “roshambo” came with a few twists, such as the introduction of the dynamite and water balloon moves. Check out all the details and rules here. I liked that it was a simple game but with competition against other developers’ bots came many options for creative strategy. Additionally, I was extremely impressed with how simple it was to build the basic bot.

Game Rule Highlights:

  • Bots compete each other throwing one of Rock, Paper, Scissors, Dynamite, or Water Balloon
  • Normal rules apply except that the Dynamite beats everything but Water Balloon and Water Balloon loses to everything but Dynamite
  • Each bot only gets to use Dynamite 100 times
  • First bot to win 1000 times wins the entire match
  • Ties carry over, so the next round could be worth more than 1 win (similar to “Skins” in golf)


It took me some iteration to come up with my eventual strategy, which turned out to be admittedly mediocre (98th place out of 162). I realized that my bot can keep track of the history of moves that it has made as well as the moves of my opponent. My plan was to try and detect if my opponent was falling into a sort of pattern. I was especially concerned about the end of the round when we both would be desperately throwing dynamite to close out the match. As you can see, my strategy only had a small amount of success.

Nonetheless, I thoroughly enjoyed my time creating and deploying my bot. I encourage Microsoft to search for more clever ways to get developers interested in learning and using their development platforms. In this contest, I got to expand my mind, learn more about Azure, and I even got a free t-shirt. Here’s to the next competition!