How to Generate .NET Classes from a Non-.NET Data Feed
August 24, 2012 Leave a comment
 Posted by The U.S. National Archives
Most people do not realize how much data is available on the web via APIs. Indeed, we .NET programmers tend to be a breed that ignores the trendy new data feeds that are available. Perhaps it’s because it is intimidating to try to interact with sites written in PHP or Ruby on Rails or maybe it’s because the only examples anyone ever shows are for Netflix or Twitter APIs (2 APIs that are not particularly useful for an Enterprise Developer). Now is the time to expand your horizons. As more and more data becomes available, the usefulness increases for all types of applications. I aim to broaden your awareness of the entire domain of public web services (APIs) and show you that
- .NET can be a great client coding-language for any standard web API
- There are great online resources to find available APIs.
Table of Contents
Before I dive head first into all the details, here is an outline of what I will cover and the basic steps involved:
- Purpose/Intention
- Choosing an API
- Review Documentation
- Determine a Sample Query
- Generate Classes at Json2CSharp.com
- Paste Generated Classes into New Application
- Massage Generated Classes
- Reference Json.NET
- Retrieve Data with a WebClient Object
- Display Results within Application
Purpose/Intention
At this point, you may be asking yourself, “why do I care about Data Feeds, APIs, and public Web Services”? You should care because it is the technology through which online companies share their data. If you think it might be worthwhile to someday automatically retrieve the weather forecast, stock prices, sports scores, site analytics, etc. and make logical decisions based on the data, then pay attention because the steps that follow are how you get started. A well-known example of a website using a public APIs is Expedia.com, which retrieves commercial flight and hotel information from multiple providers based on a user’s travel criteria. There’s very little stopping us .NET developers from gathering together multiple APIs in a similar fashion.
Choosing an API
The first step of connecting to an API is to choose which one you will connect to. If you already know, you need to find out more information about it. To do this, I used ProgrammableWeb.com, an online directory of public-facing APIs. When I started the exercise for this blog post, I did not know which API I wanted to test with, so I just clicked on API Directory | Newest APIs. As tempting as it was, I chose not to use the Stack Overflow API, because it is already built in .NET and is therefore disqualified from this blog post. Instead, the API for the Khan Academy caught my eye.
In case you haven’t heard of it, Khan Academy is a non-profit organization that provides a wide range of training videos and courseware for free online.
The Khan Academy API is perfect:
- It’s not a .NET service written in WCF (it’s Python)
- I hear about the site all the time. It’s sexy right now.
- It follows a web standard, REST formatted in Json.
By clicking the Khan Academy link in the Programmable Web directory, I was eventually taken to the Khan Academy API documentation site.
Review Documentation
Many large websites have thorough documentation about their APIs. Still, there is a wide range of information that you may come across when researching them. Some have client-side examples in .NET and others even have 3rd party libraries (e.g. MailChimp) specifically written for them. Khan Academy has a nifty tool called their API Explorer, which allows you to click on different types of REST queries and see example responses. . I’ve seen similar tools on other sites too, such as Yahoo.
Determine a Sample Query
To start creating our .NET client application, we need to determine a sample query and retrieve response data. I’d like to generate local, .NET classes to consume the information sent back from Khan Academy.
There are a couple different ways of thinking about this:
If I know specifically what type of information I will be using, I can look for documentation on how to retrieve that narrow result set. In this case though, I want to start with as many classes as possible, to fill out my .NET solution with a large portion of classes.

The playlists/library/ query is great because it returns nested results. So, for example, it has information for playlists, with sub-information about videos, tags, etc.
Having a sample response like this is half the battle, and it’s not that difficult to get for REST services.
Generate Classes at Json2CSharp.com
Once we know what sample query we are going to use, we continue to our 2nd big step, where we either paste a URL or Json results into a website named json2csharp.com.

This website converts the sample response data that we entered into .NET class definitions. With this step, we are letting the Json2CSharp website perform a significant step of the process for us automatically.
Why do we go through the effort to generate .NET classes like this?
- It enabled compile-time checking and intellisense
- Design-time use in Web Forms Gridviews, etc.
- Can be used in older versions of .NET (earlier than .NET 4), which do not yet have dynamic objects.
Paste Generated Classes into New Application
Now that I have generated .NET classes, I will copy them into my Windows Clipboard (Ctrl-C) for later use.
Let’s keep things simple by creating a brand new Web Application. In Visual Studio 2012, select File | New | Project. Then select an ASP.NET Web Forms Application.

With the new application in place, let’s add the .NET classes into the solution.
First, add a class file to the project.
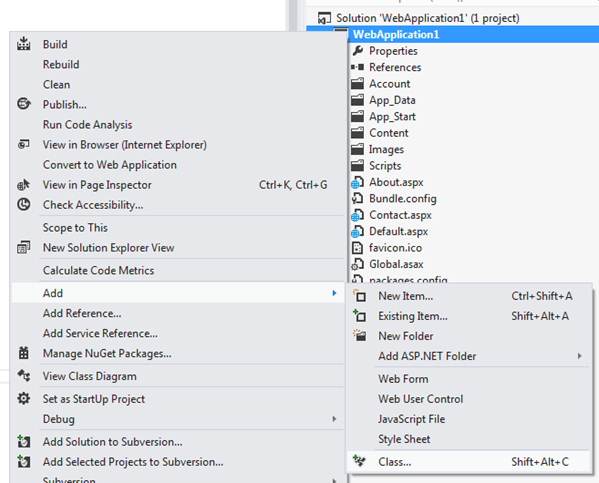
In this file, paste (the .NET classes that are in your Clipboard) over the default class. As a quick sanity check, you should be able to successfully compile the solution.
Massage Generated Classes
Json2CSharp sometimes struggles with ambiguous responses. As a result, it generates duplicate class definitions as is true in our case.
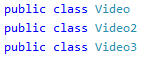
Still, it’s nice that the class generator got us part of the way toward our final code. Let’s massage our classes to remove any classes that have numbers on the end. Also, switch any reference to the duplicates back to the primary class.
Delete: Item2, DownloadUrls2, Video2, Playlist2, DownloadUrls3, Video3, Playlist3
Alter: References to Item2 -> Item, References to Playlist2 -> Playlist, Reference to Playlist3 -> Playlist
Reference Json.NET
In order to deserialize Json results into our generated classes, we need to use another 3rd party tool named Json.NET. To add a reference to this library, we can perform either of 2 methods:
Download and Add Reference
- Browse to Json.CodePlex.com
- Download the latest version as a .zip file
- Extract the relevant version of the Newtonsoft.Json.dll
- Add a reference to the dll
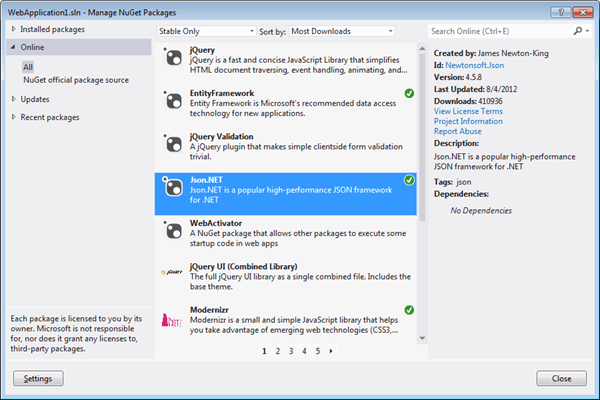
Install with NuGet
- In Visual Studio, go to Tools | Library Package Manager | Manage NuGet Packages for Solution
- Click Online in the left panel
- Click Json.NET to highlight that package
- Click Install
Retrieve Data with a WebClient Object
At this point, we’ve got the framework setup in our solution to store strongly-typed representations of the Khan Academy data. Next, we need to write the code to retrieve that data.
Here is the snippet I put in the Default.aspx.cs file to automatically retrieve the data and format it with Linq.
public static List<Playlist> GetKhanVideos()
		{
			var client = new WebClient();
			var response = client.DownloadString(new Uri("http://www.khanacademy.org/api/v1/playlists/library"));
			var j = JsonConvert.DeserializeObject<List<Item>>(response);

			List<Playlist> playlists = new List<Playlist>();
			playlists.AddRange(j.Select(i => i.playlist));
			playlists.AddRange(j.Where(k => null != k.items).SelectMany(i => i.items).Select(i2 => i2.playlist));
			playlists.AddRange(j.Where(k => null != k.items).SelectMany(i => i.items).Where(k2 => null != k2.items).SelectMany(i2 => i2.items).Select(i3 => i3.playlist));

			return playlists.Where(p => null != p).ToList();
		}
Display Results within Application
In our last step, we want to see the output of our query, so let’s leverage the drag-and-drop ability of Web Forms to easily visualize the data.
- Open Default.aspx in Design View
- Using the Toolbox, add an ObjectDataSource
- Configure the DataSource
- Choose WebApplication1._Default as the business object
- Choose GetKhanVideos() as the Select Method
- Using the Toolbox, add a GridView
- Configure it to choose the above Data Source
-
Many of the fields will be empty or gibberish, so let’s remove several columns:
- backup_timestamp
- hide
- init_custom_stack
- ka_url
- kind
- standalone_title
- topic_page_url
- url
- youtube_id
To see the new application in action, press F5 to run it.

Conclusion
With the help of a few 3rd party tools, retrieving and displaying any REST-based API in .NET can be easy. Not only that, but it’s going to get even easier. In Scott Hanselman’s ASPConf keynote, he showed an extension that is being developed by Mads Kristensen for Visual Studio 2012 that would eliminate several of these steps. It allowed an option in Visual Studio to “Paste JSON as classes,” thereby eliminating the need for the class-generation website. Microsoft realizes that the trend of creating and leveraging public APIs is not going away so they are doing something about it. And so should you.
Disclaimer: This product uses the Khan Academy API but is not endorsed or certified by Khan Academy (www.khanacademy.org).
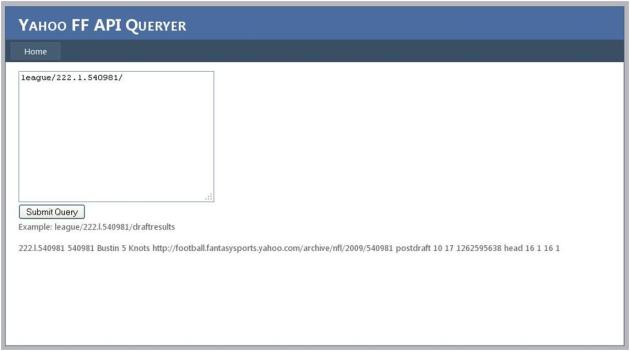
 As technical co-commissioner of my Keeper Fantasy Football league, I perform a good deal of administrative duties during the offseason. I have to sort through all the player transactions from the season to determine which NFL players are eligible to be kept within our league rules. One year, at the end of the 2010 season, I waited too long to gather this data. I normally click through the Yahoo Website to see all the historical transaction data necessary. However, after a certain point in the year, Yahoo removes access to the year’s information.

 LinkedIn
 Stack Overflow