Don’t Disrespect the Web.Config – Transformations
May 9, 2012 2 Comments
No matter how large of a project you are building nor how many lines of code you maintain, the most important file in your whole solution is likely the web.config file. It potentially contains connection strings, API keys, passwords, etc. If any of this information is incorrect you will likely see many problems in your application. Likewise, if a hacker were able to examine this file, it could mean disaster for your network. It is for these reasons that the web.config file must be treated with the utmost respect.
There are 3 things every public website should be doing with their web.config
- Use web.config transforms to keep track of development versus production settings
- Encrypt important configuration sections for security
- ELMAH – Error Logging Modules and Handlers
Each of the above topics will be covered in a separate post. As for today, we’ll discuss #1. Visual Studio 2010 introduced web.config transforms, which make it dead simple to maintain configuration information for multiple deployment environments.
The scenario:
Imagine the not-so-rare network setup of a website that is deployed on a production server, a test server, and is run locally by developers. In the old days, it was difficult to keep track of all the different environment-specific configuration options. Maybe you set the web.config correctly once for each environment and just never overrode it during a new publish. Maybe you created your own configuration text files that were dynamically linked into the application. Either way you had to spend extra time to solve this seemingly simple problem.
Thank goodness for modern IDEs.
Now it’s extremely easy to setup multiple configuration files in your Visual Studio solution, with these additional benefits:
- Easy integration into source control
- Each separate web.config file is tied to a Visual Studio build configuration
- Easier integration into automated builds and deployments
Since the web.config transformation technology has been around for about 2 years now, I’ll try and introduce a new spin on it by demoing this with the Visual Studio 11 Beta.
How to set it up:
- Open your project in Visual Studio 11 Beta. Note: new projects in Visual Studio 2010 and 11 already have multiple config transformation files.
- Open the Build menu and navigate to the Build Configuration manager.
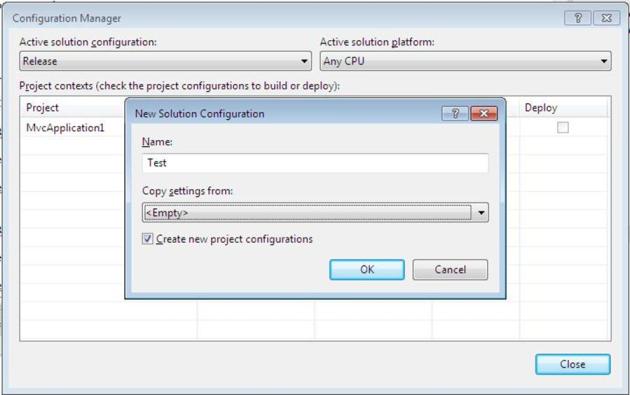
- Click the Active solution configuration drop down list and select New.
- Enter information for your test environment
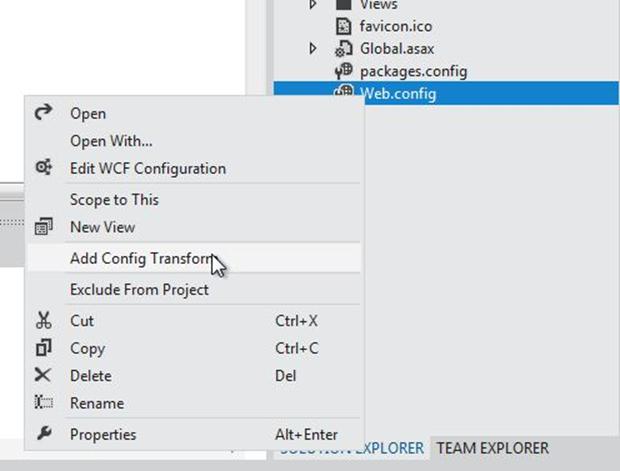
- Right click on the web.config file and select Add Config Transform. Note: If this option is not available, see this link.
-
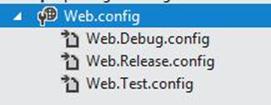
You will now see a web.config for each environment you support (Debug representing the developer’s local environment, Test representing Test, and Release representing production).
-
Next, we introduce the environment specific settings for your web.config files
- My web.config files typically have environment-specific information in the appSettings and ConnectionString sections:
<appSettings>
<add key=“apiKey“ value=“83ABC029538FED091ACDD”/>
</appSettings>
<connectionStrings>
<add name=“DBConnectionString“ connectionString=“Data Source=DBServer;Initial Catalog=DatabaseName;Persist Security Info=True;User ID=userName;Password=password“ providerName=“System.Data.SqlClient“/>
</connectionStrings>
- Since the above is configured for my development environment, I usually leave my web.Debug.config blank
- In the Web.Test.config and the Web.Release.config I replace my appSettings and connectionStrings sections with environment specific values (see this website for detailed information on syntax)
<configuration xmlns:xdt=“http://schemas.microsoft.com/XML-Document-Transform“>
<appSettings xdt:Transform=“Replace“>
<add key=“apiKey“ value=“B153439AB3DE8FF9CA9D0“/>
</appSettings>
<connectionStrings xdt:Transform=“Replace“>
<add
name=“DBConnectionString“
connectionString=“Data Source=ProdDBServer;Initial Catalog=ProdDatabaseName;Persist Security Info=True;User ID=userName;Password=password“
providerName=“System.Data.SqlClient“/>
</connectionStrings>
…
-
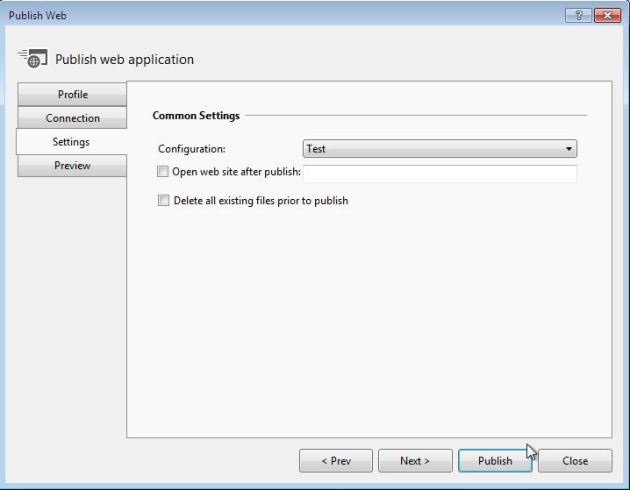
Now just choose the build configuration and publish a project. It will automatically merge the correct web.config values based on the selected build configuration.
Beautiful. Your app has been deployed with the appropriate environment-specific web.config settings. In the next post, we will discuss how to encrypt secure information that is stored in the web.config file.
 LinkedIn
 Stack Overflow
Pingback: Don’t Disrespect the Web.Config – Encryption « Midwest Developer Insights
Pingback: Don’t Disrespect the Web.Config – ELMAH « Midwest Developer Insights