Don’t Disrespect the Web.Config – ELMAH
July 3, 2012 Leave a comment
This blog series has focused on simple changes that can be made to a .NET solution’s web.config in order to enhance the development environment, enhance security, and improve troubleshooting capabilities.
You can find previous posts here:
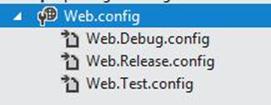
- Use web.config transforms to keep track of development versus production settings
- Encrypt important configuration sections for security
- ELMAH – Error Logging Modules and Handlers
This is the 3rd and final post of the series in which we discuss ELMAH, short for Error Logging Modules and Handlers. I am definitely not the first to write about this, but it is such a useful tool that fits snuggly into the web.config that I had to include it in the series.
What is it and why do I care?
First, let’s explain what ELMAH is. It is an open-sourced component that can be easily added to a .NET project for the purpose of logging and notifying developers of unhandled exceptions. What is an unhandled exception? It’s an error in code that a web application cannot respond to, often resulting in a “Yellow Screen of Death.”

ELMAH does not, by itself, rid your application of a Yellow Screen of Death, a screen that causes much frustration among users of your application. Instead, it automatically logs the details of the exception, and the stack trace at the time of the exception, and it can even email the development team that something bad happened.
Using ELMAH has become the standard for any project that I work on. It’s just so darned useful for troubleshooting issues and doing great customer service.
Typical Workflow of a User Encountering an Error
Most of the time, users encountering an error do not immediately send an email to support. If it’s a public website, the user might get immediately discouraged and leave the site. If it’s an Intranet website, one that users must use to perform their jobs, then he or she might back up and try it again a couple of times before giving up:
- Attempt to perform job function
- Curse at screen when exception occurs
- Try again
- Complain to boss when the same failure occurs
- Contact support
- Wait
- Lose faith in the developers of the website, the support team, and anyone else who is guilty by association
Workflow when Error Notifications are Involved
 With ELMAH in place, it is easy to short-circuit the workflow and keep users happy. You can begin to troubleshoot the issue before the user has even contacted the support team.
- User attempts to perform job function
- User curses at screen when exception occurs
- Development team member is notified that exception occurred along with details
-
As the user attempts to try again, the development team member can reach out to the user
Hello [username],
I work on the support team for [name of web application]. Our system automatically notifies us when users run into an error that it does not know how to handle, and we are aware that it affects your ability to continue through the application.
We do not yet know exactly what the problem is, but are working to find out more information and resolve the issue quickly. I will let you know as soon as this is fixed.
In the meantime, it would help us to resolve this more quickly if you could tell me [what steps you were performing when this crashed].
Lastly, I know it is less than ideal, but you might try to [perform your job through this work-around or alternative solution] until I get back in touch with you.
Thank you,
[Nathan Stuller]
[Title]
- Often, by the time the user would have contacted support, the issue is already fixed
Being proactive makes a serious impression on users (and bosses). I’ve used this technique before to reach out to customers about exceptions that they didn’t even notice. It reduced my stress level by confirming that it was a low-priority issue and also allowed me to engage with a customer about my product.
How to Get Started
The first step is go to the ELMAH homepage. There you will find the 2 most important links to enable this setup:
- Download links to the ELMAH dll you must include in your project
- A sample Web.config file (on the same page)
The Real Steps
- Download the appropriate binary to your web application folder.

- Open the zip file. Browse into the “bin\net-2.0\Release” folder and extract the Elmah.dll into your Libs folder.
- In Visual Studio, we need to make a reference to this dll from your main web project.


- Next, you need to add entries into the web.config to tell your project how to use ELMAH. The website has lots of information on how to do this, but I will try to simplify it for the common example of notifying developers by email. First, you need to add this line inside the <configSections> area of the web.config:

- Next, add the following line under the <httpModules> section. This may need to be altered depending on which version of IIS your web server is using:

- Lastly, add the elmah section (usually at the end) inside the <configuration> section:
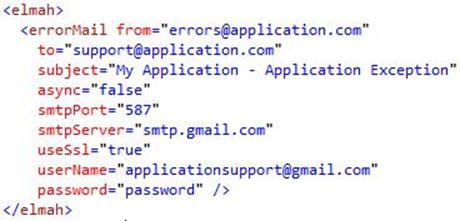
There are a host of configuration options you can set to enable ELMAH to do exactly what you want.
Wrapping Up
I hope this 3-part blog series has helped you identify simple improvements that can be made to the web.config file. ELMAH, in particular, helps me delete my clients and since it is so simple to implement, to me it is a no-brainer.


 LinkedIn
 Stack Overflow