A Guide
 Too much of the literature about the Entity Framework contains directions for mapping directly to Stored Procedures. The way it is presented, it seems easy enough. However, attempting to implement this strategy beyond a simple example quickly becomes unnecessarily difficult.
Let’s say you would like to implement a Model First pattern whereby all the entities’ create, update, and delete (CUD) methods were mapped to Stored Procedures. For cases where the database already exists or where using Stored Procedures is a predetermined constraint of the project, this pattern enables your .NET code to mimic typical LINQ to Entities code. Ideally, the mappings would be mostly abstracted away into the Entity Framework definition file. Once mapped, developers would not have to pay much attention to this implementation detail.
Unfortunately, there’s a vast difference between what you can do with the Entity Framework in a simplified demonstration and the restrictions meeting you in practice. Below is a guide that covers the pros, cons, and restrictions of the “EF-to-STP” approach.
Advantages
There are some advantages to using Stored Procedures. Mapping them in Entity Framework potentially produces the best features of both technologies.
Legacy Databases
When a database already exists that has implemented a great deal of logic in Stored Procedures, it can be reused.
Abstraction layer
Stored Procedures form a layer “underneath” the .NET code. Behind this abstraction layer, .NET developers do not need to understand implementation details.
Granular Security
Every Stored Procedure can have user-specific permissions.
Developer Skillset
Business logic implementation can be performed by a database developer whose skillset is strong in Stored Procedures.
“Advertised” Restrictions
Pluralsight.com has several video resources with tips about implementing the Entity Framework with Stored Procedures, including these three which I found helpful:
Below are some of the limitations mentioned in the videos:
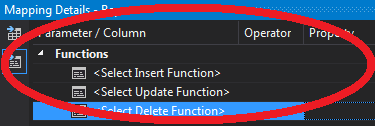
All CUD Stored Procedures must be mapped for an Entity
For each entity, if any of the Create, Update, or Delete functions is mapped, then all 3 should be. For example, if you only map the Delete function to a Stored Procedure but at runtime your .NET code causes an Update to occur on that entity, it will throw an exception. It will not use the default Entity Framework functionality for the Update call.
Parameters can be mapped only to entity properties
You cannot map the parameters to a scalar value or a function. For example, you cannot map a Date parameter to DateTime.Now.
Stored Procedures that return entities have change tracking by default
In contrast, Stored Procedures that return complex objects do not support change tracking.
Insert Procedures must return SCOPE_IDENTITY
In the last line of your Insert Stored Procedures, include the line “Select SCOPE_IDENTITY() as ID” so that Entity Framework can push the newly generated record ID back into memory.
No support for multiple result sets
Limitations Found Through Experience
The biggest issue with using EF-to-STPs is that the developer of the Stored Procedures probably did not realize the database would be consumed this way. To do it right, a great deal of consistency is needed. There must be 1 Stored Procedure for Insert, 1 for Updates, and 1 for Deletes per entity. The Stored Procedure developer may have optimized for different things, such as readability or a reduction in round-trips to the database, instead of for a standard pattern that can be used by a high-level Framework. The below tips can be helpful as a guide to developing Stored Procedures if they are not yet finished.
Do Not rely on default parameters
You must specify exactly 1 parameter per entity column for select queries. Similarly, for an update query, every column must have a parameter in the Stored Procedure, and you must map every parameter in the Entity Data Model. Therefore, Default parameters have almost zero purpose for CUD Stored Procedures in our scenario.
Do Not rely on output parameters
Output parameters in Stored Procedures used for CUD cannot be mapped in the Entity Data Model.
Do Not rely on custom or table parameters
The Entity Framework can consume Stored Procedures that have table parameters. However, they require more of an ad hoc coding structure. They do not fit well into our EF-to-STPs pattern.
No ability to include referenced tables
The Entity Framework can utilize Function Imports to return entities from Select Stored Procedures. However, the ability to include reference tables is not built-in.
Extra Stored Procedure logic can fool Entity Framework
Scenario: An Update Stored Procedure performs additional logic to update another table before updating the mapped entity’s table.
Outcome: The Entity Framework got confused by how many records were updated and rolled-back the update.
Ensure returned data types are consistent
Scenario: A Select Stored Procedure uses IF statements and CASE statements to determine what Select query to use. Reading through the code, it’s difficult to detect, but one path returns Integers while another returns Bits.
Outcome: The Entity Framework generates metadata using one path and throws a cast exception at runtime.
Proceed with Caution
The Entity Framework is a great tool, especially when it is used with LINQ queries to the database. While Microsoft and its partners describe how to map the Entity Framework to Stored Procedures, it only works in simple cases or where the Stored Procedure developer follows very strict standards. In most cases, it is not practical.
Still, the Entity Framework can very well be used to query Stored Procedures with a more verbose approach. It requires more code than EF-to-STP mapping described above. However, it typically requires less code than reverting to older technologies like ADO.NET. Just stay away from the mapping.
Disclaimer: Most of my experience in this area is with Entity Framework Version 4, but I believe it applies to Version 5 as well.
 Imagine a travel itinerary involving two adults and two kids under 2. That makes for a lot of information to track and baggage to haul. We lumbered through the airport like Mystics from the Dark Crystal. Our hectic trip down there was ultimately catastrophe-free. Then we had a great holiday.


 As December nears, it’s time to brainstorm my New Year’s resolutions for 2013. The Stuller family is expecting its first baby in that time, so it’s entirely possible that any goal I set for myself will immediately seem implausible, thwarted by a new dependent and many personal misconceptions about the transition to parenthood. Still, naming my goals will be helpful, even if only the most important bubble up to the surface over the next year.
 This past weekend I volunteered my time to the
 LinkedIn
 Stack Overflow